
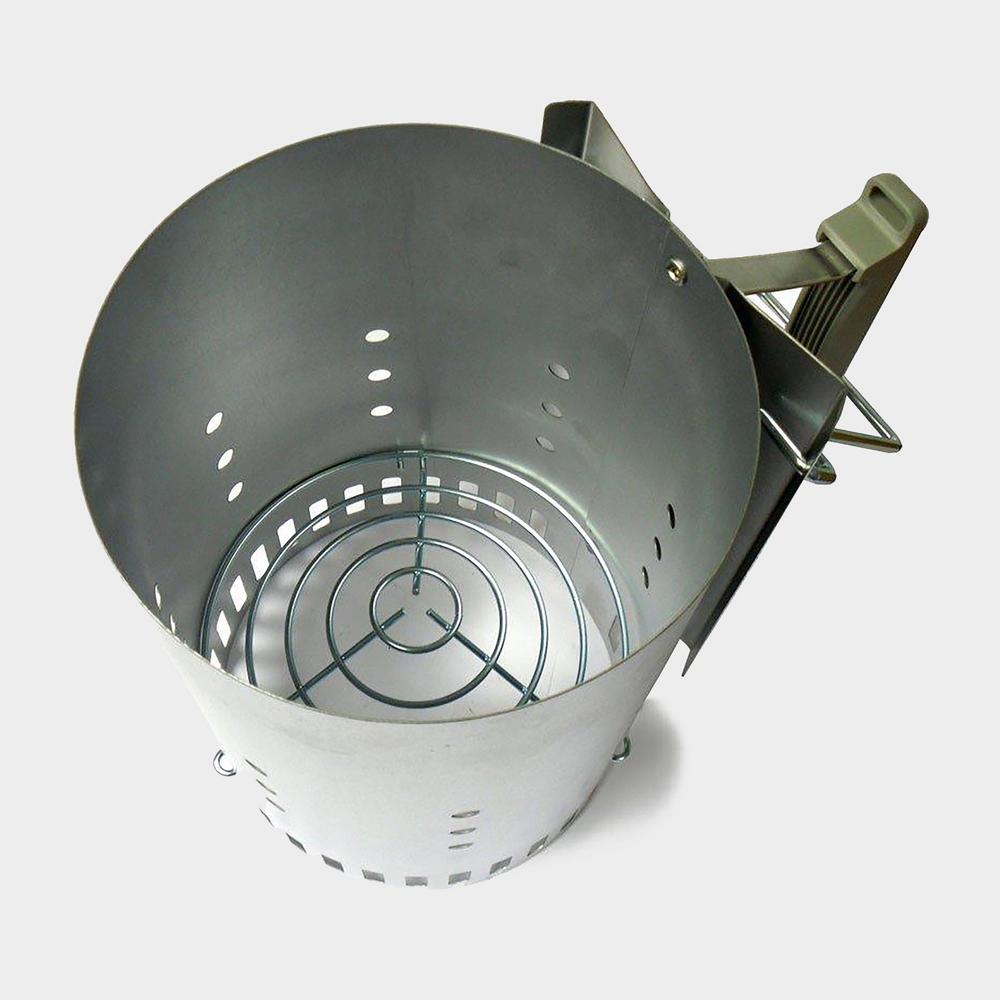
If you love cooking over charcoal but hate the slow, smoky faff of getting the coals going, a good chimney starter can completely change the way you barbecue at home and on the campsite. Tools like the Weber Chimney Starter make lighting charcoal faster, cleaner and far more predictable, so you can focus on the food rather than fighting with the fire.
What is a chimney starter and why use one?
A chimney starter is a simple, upright metal cylinder with a handle and ventilation holes. You fill the top with charcoal, place kindling or a firelighter underneath and light it; the tall shape creates a strong updraft, pulling air through the coals so they catch quickly and burn evenly.
Compared with the old method of stacking coals in the barbecue and dousing them in lighter fluid, a chimney starter offers:
- Faster lighting times and less waiting around
- More even heat across all your coals
- No chemical lighter fluid taste on your food
- Far more reliable results in breezy or damp conditions
The Weber Chimney Starter is one of the best-known examples of this design and has become a bit of a go-to option among barbecue fans and campers alike. If you want more detail on how it performs in real-world use, you can always read our full review of the Weber Chimney Starter, but here we’ll focus on practical tips and wider buying advice.
Why the Weber Chimney Starter has become a campsite staple
Weber has a strong reputation for charcoal cooking, and the Weber Chimney Starter reflects that focus on simple, robust kit. While the official spec list is fairly minimal, the design follows the classic, proven formula: a sturdy metal cylinder, a large capacity for charcoal and a solid handle arrangement so you can pour hot coals with confidence.
Out on the campsite, that reliability really matters. You don’t want to waste precious evening light coaxing damp coals into life or smoking out the neighbours with half-lit fuel. A good chimney starter means:
- Quicker time from match to cooking heat – ideal after a long day walking
- More predictable heat, so your sausages don’t end up burnt outside and raw in the middle
- Less reliance on electricity or gas – handy on more remote sites
With a strong user rating (around 4.7 stars from multiple buyers at the time of writing), the Weber Chimney Starter has clearly earned some trust. For more in-depth user impressions and test notes, it’s worth taking a look at our dedicated piece and full Weber Chimney Starter review.
How to use a chimney starter safely and effectively
Getting the best from a chimney starter is less about special technique and more about simple, safe steps done in the right order.
1. Choose a safe setup spot
Always place your chimney starter on a stable, heatproof surface such as the charcoal grate of your barbecue, a metal trivet or bare, non-flammable ground. Avoid wooden picnic tables, plastic surfaces and dry grass. Make sure there’s good airflow and that it’s well away from tent fabric and guy lines.
2. Add your fuel and firelighters
Fill the chimney with your chosen charcoal. Briquettes stack neatly and light evenly, whereas lumpwood catches faster and can burn hotter but less predictably. Underneath the grate in the base, place either a couple of natural firelighters, a scrunched-up sheet of newspaper or similar clean-burning tinder.
3. Light from the bottom
Light the newspaper or firelighter through one of the lower holes in the chimney, or by briefly lifting the chimney and sliding a lit match underneath. Once it’s lit, leave the chimney alone – the whole point is that the design does the work for you. Resist the urge to poke and prod.
4. Wait for the right visual cues
You’ll see smoke at first, then a more vigorous flame as the coals start to catch. Depending on the fuel and conditions, expect 15–25 minutes before the chimney is ready. When the top coals are turning grey and ashy with a red glow beneath, it’s time to pour.
5. Pour the coals carefully
Put on heatproof gloves, take a firm grip on the handle and gently tip the chimney so the coals pour into your barbecue. Spread them according to your cooking plan – a single deep layer for high-heat searing, or banked to one side if you want indirect heat for slower cooking.
6. Let the chimney cool
Once emptied, place the hot chimney somewhere stable and non-flammable. Even when it looks cool, metal can hold heat for surprisingly long, so treat it with respect until you’re sure it’s safe to handle bare-handed.
Choosing the right charcoal to pair with your chimney starter
Your choice of fuel has as much impact on your cooking as the chimney itself. The chimney starter doesn’t care whether you use lumpwood or briquettes, but your food – and your patience – might.
Weber Briquettes 8kg: a natural partner
If you’re leaning into the Weber ecosystem, the Weber Briquettes 8kg are an obvious pairing for the Weber Chimney Starter. They’re designed to burn for a long time with steady heat, which is especially useful for indirect grilling or longer cooks like joints of meat and whole chickens.
Briquettes like these tend to:
- Pack neatly into the chimney for consistent lighting
- Offer a longer burn than many lumpwood options
- Make temperature control more predictable over a full cooking session
For quick midweek grilling or fast campsite burgers, lumpwood charcoal is still a great option. But if you’re planning a more leisurely cook or want to keep things simple, a bag of reliable briquettes paired with the Weber Chimney Starter is a very user-friendly setup.
Lighting in low light: the case for a good camping torch
Barbecue sessions don’t always end when the sun goes down, especially on camping trips when daylight hours are precious. Having a decent torch makes lighting and monitoring your chimney starter much safer after dark.
A compact option like the VANGO Lightbeam 200 Recharge can be handy around camp for checking on the coals, reading cooking instructions and navigating guy ropes at night. While it’s not a barbecue accessory in the strict sense, good lighting pairs well with tools like the Weber Chimney Starter, especially when you’re cooking in unfamiliar surroundings.
Chimney starters vs other lighting methods
It’s worth briefly comparing chimney starters with other ways of getting a charcoal barbecue going. Each approach has trade-offs, but the chimney sits in a sweet spot for many people.
- Lighter fluid: Quick and convenient but can add unwanted chemical flavours and fumes, and relies on careful dosing to stay safe.
- Electric hot air starters: Very fast and clean but need mains power or a hefty battery, which limits their usefulness at remote campsites.
- Traditional kindling piles: Perfectly workable but often slower and more temperamental, especially if your wood or coals are slightly damp.
A chimney starter like the Weber model combines the advantages of natural lighting (no chemical additives) with good reliability and speed. Once you’ve dialled in your routine, it becomes a near set-and-forget process.
Using a chimney starter on the campsite: tips and etiquette
Carrying a metal chimney might feel like overkill for lightweight backpacking, but for car camping, festivals or family weekends under canvas, it can be one of the most useful bits of cooking kit you bring.
Check campsite rules first
Before you even unpack your barbecue, confirm that charcoal fires are allowed and whether there are designated cooking areas. Some campsites insist on raised grills, ash disposal points or specific fuel types, especially in dry conditions when fire risk is higher.
Mind the smoke and sparks
Even a well-behaved chimney starter can kick out some smoke while the coals are catching. Set it up downwind of your tent and neighbouring pitches, and avoid lighting it right next to your social area. If it’s particularly windy, consider using your car or a windbreak as a shield, but never fully enclose the chimney or block its airflow.
Plan for ash disposal
Once you’re done cooking, let the coals burn out completely and cool down, then bag the ash if the site requires it. Never dump hot ash on the ground or into hedgerows. A simple metal bucket or dedicated ash tray in your boot makes life much easier and keeps the campsite tidy.
Care and maintenance: making your chimney starter last
Chimney starters are fairly low-maintenance, but a little care will keep yours working well for years.
- Let it cool fully: Don’t be tempted to rinse a hot chimney with water to speed up cooling, as sudden temperature changes can stress the metal.
- Empty ash regularly: Once cool, give it a tap or gentle shake to get rid of built-up ash that could clog the airflow next time.
- Check the handle: Before each season, inspect the handle and any heat shield parts for looseness or damage.
- Store it dry: Keep the chimney in a shed, garage or under cover to minimise rust, rather than leaving it exposed to the weather year-round.
The Weber Chimney Starter is built with this kind of repeated use in mind, and a bit of basic care will help maintain its performance season after season.
When is a chimney starter worth it – and who is it for?
If you only light a small disposable barbecue twice a year, a chimney starter probably isn’t essential. But if you own a charcoal kettle or compact camping barbecue and use it regularly, the convenience is hard to ignore.
A tool like the Weber Chimney Starter really shines for:
- Campers who want reliable cooking heat even in changeable UK weather
- Families who don’t want kids breathing in clouds of half-burnt lighter fluid
- Anyone who enjoys longer, more involved cooks such as roasts or low-and-slow joints
- People who host regular garden barbecues and want to streamline the lighting process
Pair it with a decent bag of briquettes such as the Weber Briquettes 8kg and a sensible torch like the VANGO Lightbeam 200 Recharge, and you have a flexible, camp-ready cooking setup that works just as well at home.
Final thoughts
Learning to use a chimney starter is one of the simplest upgrades you can make to your charcoal cooking, whether you’re grilling in a small back garden or feeding a hungry group at a campsite. The Weber Chimney Starter has become popular for good reason: it takes much of the stress and guesswork out of getting your coals to the right temperature.
If you’re considering adding one to your setup, take a few minutes to explore our full hands-on review of the Weber Chimney Starter, and check out our thoughts on the Weber Briquettes 8kg and VANGO Lightbeam 200 Recharge for a complete, campsite-ready charcoal cooking kit.